"Sometimes adventure calls and we ignore it. We miss the opportunity for a lifetime of memories. Go ahead, be adventurous" ~Maria Villanueva
Showing posts with label hand made card. Show all posts

March 15, 2011

Coffee Anyone?

Are you a coffee drinker? Do you have a friend who loves coffee? well, if the answer is yes, you are going to love this card.

I learned to make this from a craft book, I can't reference which one since I have a gazillion crafty books.  It's very easy to make and has a great effect. 

Before I  get into my card, I want to share a quick story about my son.  He is eight years old and he is as curious about life as any other child his age.  He stayed home from school today due to a little illness and I decided to take him for ice cream.  As we were driving to the ice cream place he asked me, "mom do you want to know what I hate about my life?" as I heard the question, I wondered if he was about to share an interesting philosophical view about life that I may have missed out on when I was his age, so I listened intently, "yep" I said, "tell me".  "It's that I keep seeing trash trucks everywhere, they are everywhere I go! what are they trying to tell me?".  As I pondered on the fact that I didn't miss out on life altering knowledge in my youth I quickly said, "they are trying to tell you that your room is dirty and you need to clean it" to which he replied, "haha mom, that's a good one!"..........BOYS!

On to my card.  This is what it will look like:
 and here's what you'll need:
scrapbook paper, rubber stamps
 ground coffee, double sided tape, scissors
 a craft heat tool (a hair blow dryer will not work)
 a Versa Mark stamping pad and an Ultra Thick Embossing Enamel
 First, cut your paper according to the size you want your card:
 The paper in the middle is going to be a tag, just cut a rectangle and cut the corners, this becomes a tag.
 stamp your rubber stamp images on your paper.  I'm using colored pencils to color in the picture of the stamped image.
 next, mix your coffee with some embossing enamel, about 50/50.
Next, cut out a hole with a hole punch and add some ribbon or cording through the hole

 Take your Versa Mark pad and stamp all over your tag, like so:

 next, add your mixture of embossing enamel and coffee:

Next, use your heat tool to heat up your tag and activate the enamel:

When you are done, it will look like this:
it totally smells like coffee, mmmm!
Next, embellish and place inside your card:


and that's a finished card that smells delicious!


November 26, 2010

A Pink Card And ATC Swap

What a crazy weekend this has been.  Lots of food, lots of cooking and lots to be grateful for.  Forget all the "things" I own, it's family and friends that make me happy.  I want to dedicate this post to my little sister whom I love, she was brave enough to cook the turkey this year at my mother's house and I love her for doing that. My mother was so happy to sit back and relax since my little sister did all the cooking, way to go Julie.

I'm joining Beverly at How Sweet The Sound for Pink Saturday, a weekly linky party that I like to join as I LOVE all things PINK. I'm also joining Cindy Adkins of Whimsical Musings  for a creative challenge.

This is a tutorial on this cute card I learned to make at the Scrapbooking Expo I went to a few weeks ago.  I love the way it displays.  I don't know what it's called but I guess we can call it "Display Card", why not.
Here's what it looks like all finished:
Isn't that ca-yoot? reminds me of a little pink dress I used to have when a was a little girl and I'm sure I had a little purse to match.....I've ALWAYS loved purses, my husband calls me the bag lady, haha.

What you'll need: scrapbook paper and an image
a paper cutter or scissors and glue or double sided tape
Some embellishments:

First, cut your cardstock to sizes below:

I laid them all out so you can see the pieces and their sizes but you don't have to write the size on them.

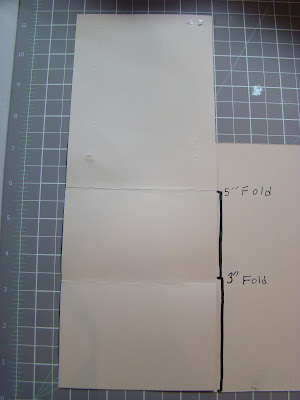
The 11" X 4 1/4 piece of cardstock is the base of your card.  You will need to fold this piece like in the picture below at three inches and at five inches: don't mind the piece of cardstock on the right, I know it's a little confusing, I used it to show the measurements of the places where you will fold, it was either that or writing it on the gray mat....and I wasn't about to do that.
You will need to fold the card so that you can place the piece that will display your image, glue the bottom part only:

here's the card folded, the smaller strips of pieces at the base hold the card up. 

The next steps are just layering your pieces as the pictures below show, here's a side view:
and the front again:

 Now, on to my Artist Trading Card (ATC)
 The ATC card I received is from the talented Denisa of Full Of Gold. She made me this beautiful ATC that I just LOVE! I love the colors and the design.  I'm using this one as a book mark, it will be nice to see it every time I open a favorite book.

It's made with fabric and a very soft felt.  She embroidered right on the card! check out the texture on it:


 And the back looks awesome too:


 And this is the card I sent her, it's called "Flowers".  I embossed it with gold copper and green embossing powders.  It's a powder made out of wax that melts when you heat it.  I used a vase paper punch and four small flowers.  


If you'd like to see more ATC cards, or, if you'd like to join in on the ATC swaps , head over to Blissfull ATC Swap .

Hope you are all having a wonderful weekend with family and friends, thanks for hanging out with me.  Come back soon!


November 19, 2010

Thank You!

Lynn over at The Vintage Nest has a Thanksgiving linky party.  Also, Beverly at How Sweet The Sound is hosting her Pink Saturday linky party and I'm participating in both! I'm quite the party girl, haha.

Everybody sing with me....put your hands up in the air, the roof, the roof, the roof is on fire! let's call the firemen to put the fire out!  we need water Mr. Fireman, water! wooo-hoooo!

I know, I know, I changed the lyrics, had to once I had kids.  I had to make it PG rated....I like the PG version better anyway, I'm not much of a sailor mouth.


On to my Thank You post:

This is a very special post as it relates to my gratitude to everyone around me in the real world as well as all the friendships I've developed in blogland.  Both my husband and I have amazing families and a lot of very kind and generous friends.  I wish you all lots of blessings, joy and peace and thank you for being my friend.

Thanks For Being You


October 08, 2010

Pink Halloween Divas

Hello To All Pink Ghouls, ahm, Girls Out There

Today I have something very special for you to see.   I have been wanting to introduce you to these rubber stamps since I started blogging.  They are my favorite stamps from a huge collection at Stampotique . Although they look "Halloweenish" I use them all year long.  Stampotique has a designer's blog where they post projects made with their rubber stamps (http://stampotiqueoriginals.blogspot.com/).


Here's how I made it:
First, cut out your paper to the size you need and collect all your stamps and embellishments.  These stamps were purchased at Michael's the arts and crafts store.

If I were to describe my relationship with Michael's, I'd say he's like that "bad boy" boyfriend you had in Highschool.  You know the one.  You know you SHOULDN'T date him, as the consequences might be dire, leaving an arm and a leg there (for international readers, that means leaving all your money there).  BUT! you just can't help but visit him because you're......IN LOVE.  And if mom said you can't date him, well, fooie, you just will do as you please because you're.....IN LOVE.
And I know I'm not the only girl In love, I once heard a lady say, "Helloooo Lover" right in front of the store! And he teases you with those 40% off coupons, oh yes he does! and those coupons sure look good. 

Ahm, back to reality, here are the stamps from Michael's:

 and here's my background stamp, also from Michael's:
And these awesome stamps from Stampotique:
 I also used this product from Tattered Angels, sprayed all over my white paper, after all the rubber stamping had been done:
 And this product, from Marvy Uchida, I used this on the cat to give him fur.  It's very easy to use, just color in the area and use a heat gun to warm it up, the paint will puff up like velvet:
You can see the detail on the cat here:
 I used a fun technique called, masking.  You stamp on your project, then you stamp on a scrap paper.  Cut the images out from the scrap paper and use them to cover your project images.  Use removable adhesive like the one on the picture.  You can find this adhesive at Michael's or on ebay.  Adhere your cut outs on top of your stamped image on your project.  Once your project images are covered, you can spritz, stamp, water color, or do anything to your project and your images will not be affected by it.  Once you're done, remove the scrap paper image and your project image will be clean.

Here's my project images covered by my scrap images:
Now I can go ahead and spritz and rubber stamp on top and the image underneath will not be affected.  Once I'm done rubber stamping the background, I can remove the scrapped cut outs and the image underneath will be ready for me to color.
You can see that the paper the girls are on is pink, that's because I sprayed them with the Tatterd Angels spritz.  It gave the paper a pink tint and glimmer shine.

I also used these cool non-smear  chalks to add color to the three Divas:


 Hope you liked this project, let me know if you will give it a try so I can come over and see.

hope you have a scary weekend!

Today I'm joining Cindy Adkins at Cindy's  Whimsical Musings Creative Spirit Challenge:


and Beverly at How Sweet The Sound in her Pink Saturday Linky Party

June 27, 2010

Hand Made Flower Greeting Card

So many graduations this month but I think we've covered them all from both sides of the family.  There may still be one more pending, my niece who graduated from UC Santa Barbara.....go Mayra! Today we celebrated my nephew's graduation from high school.  What a feeling to have your life just waiting for you and the possibilities are endless.  I was lucky enough to have the choice of going to college.  Earning my bachelor's degree became the most important thing to me after high school.  I had an unrelenting determination to succeed.  I selected Accounting as my major.  I loved the subject but, let me tell you, it's not an easy subject to study.  I became a tax preparer, then an auditor then an accountant and now I'm a manager, I'm so versatile, lol. It goes with my personality, my interests are infinite and my interests become my passions.  I'm happiest when I have a gazillion things on my to do list.....I know it's crazy, but I can't help it.  

The tutorial today is on a very pretty card that you might want to give to a graduate.  It's very easy to make and all you need is two pages of scrapbook paper, 5"X5" envelope, tape, ribbon, eyelets and an eyelet setter.

First, cut a scrapbook paper, plain color into 5"X10" and fold in half.  This will be the "greeting card", set it aside for now.

Next, you will make the "pouch" where you can place a special something inside it.  A tea bag, a gift card, movie tickets...etc...
cut a decorative scrapbook paper at 4 3/4"X 8.5"  Fold the decorative paper lengthwise at 3" like this:     


Next, fold your decorative paper and use your hole punch and punch out a hole in each corner


In the picture above, I'm positioning an eyelet with an eyelet setter on the corner hole I made.  You can skip this part if you don't have an eyelet setter.  Here's what your pouch will look like:
 Now we will embellish the pouch.  Get some pieces of ribbon and pull through your eyelets, like this:

 Use tape on the back, don't worry if it doesn't look pretty, no one will ever see this side:

Do this will all sides and it will look like this on the back:

next, stamp a message on your pouch with a rubber stamp:
Your embellished pouch will look like this: notice how it looks on top of the "greeting card" you made earlier.   

and inside the pouch is where you'll place your gift:
Add some glue or double sided tape to the back of your pouch to attach it to your "greeting card":
 And here's what the finished card looks like. I placed gift tags inside.  To see how I made the gift cards, go here


In this case, I used a gratitude rubber stamp because it was a thank you card that I made, but you can write congratulations or happy birthday or what ever sentiment that fits your gift.  Inside, you can write a special message and insert the whole thing in an envelope.  You can find 5"X5" envelopes at office supplies or craft stores.  This is definitely one of my favorite cards. 

Let me know what you think, click on comments below to leave a comment.


Come join the fun at these linky parties,

Making Sumo Sweet Stuff


The Girl Creative

LinkWithin

Related Posts with Thumbnails