October 28, 2011

Vampire Coffin Mini Album

My Halloween decor continues today with a cute mini Vampire coffin album.  Perfect for small Halloween photos and mementos.  Here's what it looks like finished:


Here's what I used: a paper mache coffin you can get at an arts and crafts store
A variety of crylic paints, I used black, white and silver.  Also some jewelry findings.
 

I first painted the coffin black and the side of the lid in silver.  I painted the inside of the coffin in white.  I attached the jewelry findings to the lid.

To create the mini album.  Take the lid of the coffin and use it to trace a template to make the pages for the mini album.  Remember to cut inside the line at least a quarter inch so it will fit in the coffin when done.
Next, fold an 81/2" by 11" sheet of heavy card stock paper (in the scrapbooking section of an arts and crafts store) I used white and gray cardstock.  Place template on the fold.  Trace and cut, this will give you two attached coffins.
cut several this way (ending with an odd number of pages cut; 3,5,7 etc so it will fold nicely on the front and back).  I alternated between the gray and the white cardstock. Next overlap one of the coffins with the next set each time and glue together.  This will give you an accordion type fold on all your pages.
accordion fold:

Here's my finished mini album, I used fancy scrapbook paper to cover the front of the album and I added a label.  I added some flowers for embellishments:

here are the inside pages ready for some Halloween scrapbook paper and pictures:

here's a look with album inside coffin:
side view of coffin:
front view
BWAHAHAHA! 
ThE CouNt WisHeS YOu A SaFe And HaPpY HaLLOweEn!


October 27, 2011

A Halloween Table

I decided to use a white tablecloth for my Halloween table. I love my little Witches, I have them all over my house. The dishes are from Party City, they're made out of melamine.


I have a tutorial on how to make these cute Witch's boots, check it out here (LINK).
 
I'm sharing this at Susan's Between Naps On The Porch.  Go check out more tablescapes


Happy Halloween Weekend Everyone


Halloween Decor

This month is just flying by and I have so much left to do.  Why is it that when you have a long to do list, the days just fly by.
I have some glass vases for Halloween that you can use to decorate your home.  I love these, they look great and are so easy to decorate.


I started with some paper die cuts:
I distressed the white fence with some Tim Holtz distrssed ink, walnut stain and black soot

and added some black birds used a Martha Stewart paper punch
I purchased three different sizes of glass at the dollar store

paired them up with candle holders
I used Gorilla Glue to glue them together, let it dry over night

add your cut outs using Mod Podge glue

here's a different version using a Sharpie marker for the vine and the same Martha Stewart paper punch for the birds

Hope you're all having a spooky day!

October 24, 2011

La Llorona At My House!

Hello Bloggers! I'm back this week but this time I have an urban legend very well known in Mexico and Latin American countries.

"La Llorona"  "The Weeping Woman"

Legend has it that long ago a beautiful woman took her children to the river to drown. She did this in order to win the love of a man she was in love with but the man later rejected her.  Full with grief over what she did, she then killed herself.  Once at the gates of Heaven, she's asked about her children.  When she couldn't account for them, she was forced to roam the world to look for them.  She is known for taking any misbehaved children with her.


LA LLORONA AT MY HOUSE
I'm going to share a video with you that my son took while I was trying to calm the puppies down one night, not long ago.  The puppies were very feisty and running around wild.  We wanted to photograph them and couldn't get them to settle down.  I didn't know my son was filming it, I thought he was just taking a picture.  You can hear me say, "take it, take it, take it" in the video towards the end, as I was telling him to take the picture.  Throughout the video, you can hear weeping in the background and a loud sigh at the end.  The TV was not on and my son and I were the only ones in the house besides the puppies......or so we thought! It's a scary thing when you capture something strange or inexplicable on video or camera.  The puppies are too cute and they might not let you concentrate.  But try to listen to her in the background concentrate on the sounds, specially towards the end when you hear a loud sigh.  


If you have a spooky story, leave me the link in the comments below.

Hope you have a scary week everyone, thanks for coming by. 

October 16, 2011

Haunted House for Home Decor

This was a fun project for the kids.   

  • We took a medium size box, cut out the sides 
  • Painted it all black with acrylic paint  
  • We used a cereal box to cut four triangles and taped them together to make the roof  
  • We added some ghostly cut outs, curtains and ribbon  
  • I placed inside two plastic tea candles, battery operated 
  • We also added a lighting fixture on the ceiling.  You can find the miniature house lighting fixture at a hobby store.  You can see the picture below, I photographed it next to a quarter so you can see the actual size of the lighting fixture  
  • Lastly, we placed some dancing skeletons inside and pumpkins on the outside.


October 10, 2011

Featured Artist: Bonni Reid

Hello Bloggers! Today I want to tell you all about an amazing artist, her name is Bonni Reid.  You can read her short but very impressive bio here LINK.

I first came across her artwork in a little shop at Placita Olvera in downtown Los Angeles.  There was a necklace inside the shop with a beautiful image inside and I just fell in love with it.  After asking around, for almost a year (I wasn't gonna give up), I found the artist! She invited me to one of her Gallery showings and I cannot wait to meet her.
Check out this beautiful image Titled "Dead of Night". 
Bonni Reid

"Death is no barrier for Love and life is our freedom to Love"~Maria 

You can see Bonni Reid's amazing artwork at BonniReid.com or, if you live in Southern California, go check it out and meet her in person at La Luz De Jesus Gallery November 3rd and 4th.

La Luz De Jesus LINK
4633 Hollywood Blvd
Los Angeles CA 90027 


Happy "we're getting closer to Halloween"  everyone!


September 30, 2011

Witch's Boots Tutorial

Finally what everyone has been asking me about, how to make a pair of Witch's boots like the ones on the Halloween tablescape, see here:
While I can't take the credit for making those cute little boots, I'll show you a way you too can make your own.  It all starts with a visit to the thrift shop.

These are the ones I decided to purchase, a dark brown pair for five dollars

I used some gloss black spray paint and sprayed them two coats.
I used Air Dry Clay, you can find it at Michael's the Arts and Crafts Store and a water spray bottle, you'll need to spray the clay because it gets dry very easily.
I used the clay to mold a piece that will go at the end of the boots:
I affixed these tips to the boots to mold and make sure I get a snug fit.  Let the tips dry for 24 hours.
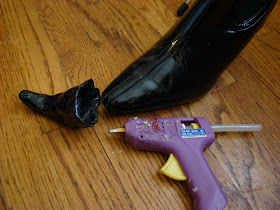
Next, spray paint the tips with the spray paint to match the boots and adhere them with hot glue
see, how clever:
Next, we'll hide the seam around the tip with ribbon, I liked the ribbon so much I adhered it all the way to the top.  Use your hot glue gun to adhere the ribbon to your boot
Next, get some more ribbon or some shoe laces, mine are actually purple but all the pictures I took came out blue.  Use your heat gun to adhere the shoe lace criss cross all the way up.
Tie a bow at the top
next, use some fabric or paper or tulle to make a bow.  I used tulle and added a button
You can't wear them but you can use it as home decor for Halloween
I'm using them on my Halloween table
Thanks for coming by, hope you liked this tutorial.  Let me know if you try it, I'd like to see how yours come out.