September 30, 2011

Witch's Boots Tutorial

Finally what everyone has been asking me about, how to make a pair of Witch's boots like the ones on the Halloween tablescape, see here:
While I can't take the credit for making those cute little boots, I'll show you a way you too can make your own.  It all starts with a visit to the thrift shop.

These are the ones I decided to purchase, a dark brown pair for five dollars

I used some gloss black spray paint and sprayed them two coats.
I used Air Dry Clay, you can find it at Michael's the Arts and Crafts Store and a water spray bottle, you'll need to spray the clay because it gets dry very easily.
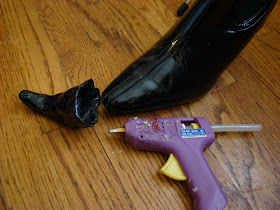
I used the clay to mold a piece that will go at the end of the boots:
I affixed these tips to the boots to mold and make sure I get a snug fit.  Let the tips dry for 24 hours.
Next, spray paint the tips with the spray paint to match the boots and adhere them with hot glue
see, how clever:
Next, we'll hide the seam around the tip with ribbon, I liked the ribbon so much I adhered it all the way to the top.  Use your hot glue gun to adhere the ribbon to your boot
Next, get some more ribbon or some shoe laces, mine are actually purple but all the pictures I took came out blue.  Use your heat gun to adhere the shoe lace criss cross all the way up.
Tie a bow at the top
next, use some fabric or paper or tulle to make a bow.  I used tulle and added a button
You can't wear them but you can use it as home decor for Halloween
I'm using them on my Halloween table
Thanks for coming by, hope you liked this tutorial.  Let me know if you try it, I'd like to see how yours come out.


September 22, 2011

Halloween Cards

Are you one of those people who can laugh at a drop of a dime? sometimes I can't seem to control my laughter.  I laugh at everything and have had my share of uncontrollable bouts of laughter.  An older brother an a niece are the same way......just don't get us started.  It's kind of a curse sometimes because there have been times where it's inappropriate to laugh and there I am trying to hold my laughter, until I erupt.  Have you ever laughed so hard, you feel like your heart will stop if you don't stop laughing? this happens to me all the time and it doesn't help that I'm married to the world's funniest man.

Last week I worked at an earthquake conference, nothing funny about that until you get ME in the room.  I was working as a greeter and was assigned the task of seating late-comers so that they would not disrupt the guest speaker.  As people walked in late, I was to find them a seat and lead them to it.  I decided that a gentle pat on the shoulder was a great way to get a person's attention to quickly ask if the seat next to them was taken.  I would then get a yes or no response and fill the seat if necessary with someone who came in late. 

During one of my gentle pats, I startled the person so bad that you'd think he was having a heart attack!.  His legs were crossed and the top leg swung up, like when the doctor checks your knee reflex.  He shook his head so violently that he's glasses went flying across the table, and of course I found this hilariously funny.  My instinct was to erupt in laughter, but I had to hold it in.....after all, I was in charge of not letting anything or anyone disrupt the guest speaker.  I couldn't even apologize to him for startling him, I was too busy holding back my laughter.  The only thing I could do was to conceal my lips with my hand and mumble "available" while biting my lips and pointing to the chair next to him.  His face was white as if he had just seen a ghost but he managed to shake his head while pressing his hand hard against his chest.  At that point, I could hear the other people seated at the table making funny noises as if they were holding back their laughter.  I went straight out the door to relieve the laughter and hoped no one followed behind, thankfully no one did.  The guy was okay, no paramedics were called, but I had a good laugh session outside. 

Do you have a story to tell where you laughed uncontrollably? or did you get caught up in a funny situation and had to hold your laughter? let me know in the comments below, I'm sure I'm not the only one.

Last night I spent the evening with a group of friends in Montebello, a nearby City.  We made some Halloween cards and traded with each other.  There must have been about fifteen ladies there last night but I'm only going to show you a few cards that were my favorite.

The first one was created by Kim Lamos, I took the picture at an angle so you can see inside the window.  There's a moon in the corner and a picket fence.    

The next one is an ATC card and it was created by Tina Rivas.  She used rubber stamps to emboss images and stamped the skull image on acetate.  I like the way she kept the eyes white.

The next one was created by Rose Rodriguez, she stamped her image on acetate.  The stamped image is from Close To My Heart, Halloween collection.  I love the background paper and the paper punch at the bottom of the card.
next is a cute vampire created by Carmen Mazzola.  She used rubber stamped images and colored them in with colored pencils.
next is Maggie Arguilles' card, she is a published artist.  She said she used acrylic paints on acetate.  I've never worked with acetate, I like the look so I'll be trying that soon. Once I figure out her technique, I'll write a step by step tutorial.

the next one is from Karen, I just love the paper she used and the little window in the center, how creative.

The next one is from Kat, she taped the card front to a goodie bag, how clever is that! she also wrapped a candy bar in scrapbook paper and placed an ATC card on top......I ate the candy bar before I took a picture, sorry....but you get the idea, right?
and the last one is mine, I feel it's kind of plain after looking at all the cards these ladies made.  I used a Day of the Dead loteria card stack and triple matted it with card stock to make the card stand out. I purchased my loteria at Olvera Street in downtown Los Angeles but I found a website store that carries it, here's the link if you're interested, they're located in Santa Rosa California: Day of the Dead Loteria.
I hope you liked these Halloween/Day of the Dead cards and I hope you've been inspired to make some.  Thanks for stopping by and I hope you have a great weekend!


September 18, 2011

Recycle Materials Artist Trading Cards

I just got back from spending a few hours with my artsy friends.  These ladies are very talented and today have come up with more ideas than I can conjure up myself.  Today's theme was "recycle" and we were to make Artist Trading Cards (ATC) with mostly recycled things to swap with each other.  Artist Trading Cards are made by artist to trade with other artists.  The concept is similar to trading baseball cards, in fact, they're the same size.  
This card is a Crafty Chica Product Line

It's not just fun and games, though.  Today we had a serious conversation about what exactly were we, as a group.

Are we just random innocent ladies who love to craft, hot glue gun in one hand a brush in the other?  

Are we a group of artists who are addicted to paper crafting? 

OR

are we, gulp......A CULT! ....GULP!....

Well, thankfully, we all agreed that we do exhibit signs of addiction....'com on, I KNOW you have skeletons in your closet too, in my case, it happens to be paper in my closet.....tons and tons of paper, hahaha, but we are in no way......a cult!

Well, now that I know I'm not in a cult, I can go on with my blogging, whew! 

The first ATC card is a technique that Ally Sanchez taught us.  You take a paper bag, crimple it up and use shoe polish (the paste) to rub on the paper, fun and easy.
 Next is Pat Esteves, she used the packaging of something she purchased. It's a thick clear plastic packaging.
She embossed a Hello Kitty and added some glitter and a paper flower.  To make the flower, she cut the paper in a spiral and rolled it up. 
next, is from Florentina Rivas, Tina.  She used corrugated paper from packaging, the stem was made from the wire wrapping of a bottle of wine....niiiiiiice.  She used recycled paper for the flower using Tim Holtz, Tattered Flower die, you can find it here.  She used Gold Glimmer Mist, you can find that here.  
 next is Carmen Mazzola.  She used various packaging materials, including bubble wrap, corrugated cardboard, tissue, twigs, pine cone ends and various shells. 
The next one is from Kim Lamos.  She used a Pepsi can to make the bottom of the cup cake.  The top of the cupcake.....you're not gonna believe this.....she used paper made out of elephant dung!!! oh yes my friends, this takes the prize as far as recycled materials.  I tried to scratch and sniff but, trust me, it does not smell...at all!  you can read more about this paper here.
The next one is from Virginia Binion, Jinnie, a pretty little flower made out of a recycled book and tinted with a brown ink pad.  Love the color combination on this one.
The next one is from Cheryl Shoats, she used a soda can to cut the Tattered Flower from the same die as Tina above.  She used butterfly die cuts embossed to give them texture.  I loved that she used the colors of the soda can and incorporated it in her design.
next is Rose Rodriguez.  She used bubble wrap...genious! to mimic the bubbles under water.  She used little die cuts for creatures under the sea.  The red netting is from a bag of oranges...cool! the algae was cut from a green plastic bag.
Lastly, this is the card I made to trade with the ladies.  I used a cereal card board box as my base.  For the background, I used pages of an old book.  I used the inside bag of a POP's cereal to cut the cage using Tim Holtz die, find it here. I strung a lace ribbon through a soda pop cap.  The metal heart is a small paper clip bent forwards to create a heart.  The butterfly was made using a recycled take-out plastic container.  To get step by step instructions on how to use this plastic, go here.   I used blue ink around the edges for dimension.
And that wraps up our group's recycled ATC cards.  I sure got a ton of ideas from these ladies, I hope you did too.  If you would like further instructions on a technique discussed here, please send me an email (see my profile) and I'd be more than happy to go over it with you. 

Have an awesome day tomorrow, thanks for coming by!

September 11, 2011

Un Voyage A Paris

Hello Bloggers! I appreciate all of you who come by to visit, even though I haven't been posting as much lately. Although I love blogging, sometimes important things, people, situations, just need my time and attention.

I got up very early this morning to write this post as I'm very excited to spread the news about a new club created by my bloggie friend, Cindy Adkins, author and artist of Cindy Adkins' Whimsical Musings.

You can read more about this club here; Shabby Chic Girls' Club

She has also featured my candle embossing project on her site along with several other cool, easy to make, projects that will take you on a voyage to France.  When I think of Paris, I think of Love and Romance and what better project to post than this beautiful heart embossed candle.  You can check out her post and other cool projects here.

You can learn to make this beautiful candle with my tutorial here.

Jour Heureux Mes Amis!.....Happy Day My Friends!

September 01, 2011

Frida Kahlo Shrine

I went to the Rose Bowl Flea Market, in Pasadena, a few weeks ago to try to find some steampunk art supplies.  My head was spinning from all the stuff that was there.  I have a few projects coming up with a steampunk theme and wanted to see what was out there.  If you have not heard of steampunk, think....Johnny Depp, Edward Scissor Hands, Sleepy Hollow, or Jim Carrey's Lemony Snicket's a Series of Unfortunate Events....It's vintage, futuristic past, victorian sci-fi, speculative fiction...etc...

Anyway, I was walking around the flea market with my twelve year old son when, all of a sudden, I felt his arm fiercely swing towards me, stopping me in mid motion, nearly giving me a heart attack.  He said, "stop! I think I found the one...." his eyes twinkling and glazed, looking in the direction of a small crowd....I looked over in the direction and saw a scantily dressed teen girl.  BOYS!!! always looking at girls....you'd think I would be used to this by now, I've got two very "impressionable" boys.  

This time, I thought I'd do the same thing to him to get a reaction, hahaha (wickedly laughing).  As we walked by a different aisle, some time later, I stopped him in mid motion.  I swung my arm, just like he did to me, and in a loud voice I said, "STOP! OMGosh! I THINK I FOUND THE ONE" he looked confused and a little terrified as he looked at the young salesman in the booth.  "....aaah.....Mom??!!!?" I heard him say in a shaky voice as I walked straight past the salesman and reached for a steampunk image inside the booth.  Once he realized I was talking about the image, not the salesman, he started breathing again and said, "Mom, that is NOT cool!".  The look on his face was priceless!

Moral of the story; watch what you say to your mamma!!!  

I will have some steampunk ATC artwork in a few months to show you but for now, I want to show you this Frida Kahlo "Dia De Los Muertos" Day of the Dead shrine I made a while back.  Day of the Dead is November first and second and is celebrated throughout Mexico.  It's a day to celebrate those who have passed.  You can read more about it here.  I just recently started celebrating it, no one in my family ever did so I wasn't sure what it was at first.  One of my neighbors had a big Day of the Dead party four years ago and I wasn't sure what it was or what to expect.  It was all so well thought out that the experience left me wanting to celebrate every year thereafter. 

Do you celebrate Day of the Dead? 

Here's the back part of the shrine, I just glued some pink paper to the wood back piece of a wooden display frame.  You can get the frame at an arts supply store.  I added a Frida image inside an embossed shrine.  To get step by step directions on embossing, go here.  I also added some doves I got at a craft store.
 
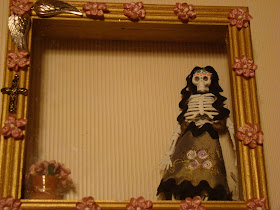
To the inside of the wooden display frame, I added a skelleton, small jug, small rug.
The skeleton was a beige color that I got at Michael's arts and crafts store but I painted it white with acrylic paint.  I dressed her up with some fabric scraps and glued rick rack around her head.  I also dotted some color to her forehead to make her look like a sugar skull. To the outside, I painted it in gold and I added silk flowers with hot glue.  I also added a metal cross and wings and attached them with a small nail.
and when I put it all together:

I used these two rubber stamps for my images;
I got the shrine from Inkadinkado and the Frida image from  Stampotique
I like the way it turned out, I hope you liked it too.  I think I'll be brave and use bright colors on the next one.  I hope you get inspired to make a shrine this year, there's plenty of time to gather your supplies.  You can choose to make it to honor a relative that has passed and use embellishments that tell a story.  For example, if the person was a golfer, you may want to use a tee or a golf ball to decorate your shrine. 

Thanks for stopping by, hope you have a wonderful weekend!